Quem já instalou SharePoint alguma vez na vida sabe que o de PreReq tools não funciona.
Criei um script que isenta de ficar configurando entrando no Manger Server, não precisa ficar dando boot nos servidores, esse script torna o provisionamento de uma Farm bem dinâmico.
Estou usando o Windows Server 2016 para instalar o SharePoint 2016, vamos seguir a instalação de alguns PreReq como padrão. Antes de iniciar uma instalação SharePoint que gosto de organizar as etapas a serem seguidas como na imagem abaixo:
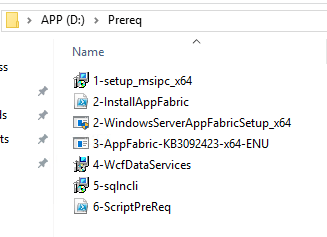
A maioria dos executáveis é apenas rodar e pronto, apenas um ressalva na instalação do AppFabric, que você pode encontrar mais detalhe nesses links:
- Erro ao Instalar AppFabric SharePoint 2010, 2013, 2016
- Application Server Role, Web Server (IIS) Role: Configuration error
Após ter executado as cincos etapas anteriores, vamos para sexta etapa, digo que é a mais simples de todas, lembre-se de provisionar um drive com o Win 2016, ele que nos auxiliará na importação nos módulos.
Só seguir as etapas abaixo, é bem simples.
- Abra o PwerShell ISE como Administrador.
- Vá até o Windows Server 2016 provisionado, no meu script eu coloquei “e:\sources\sxs”, mais se seu WinSVR 2016 esta em outro driver, é só ir no script abaixo e editar :).
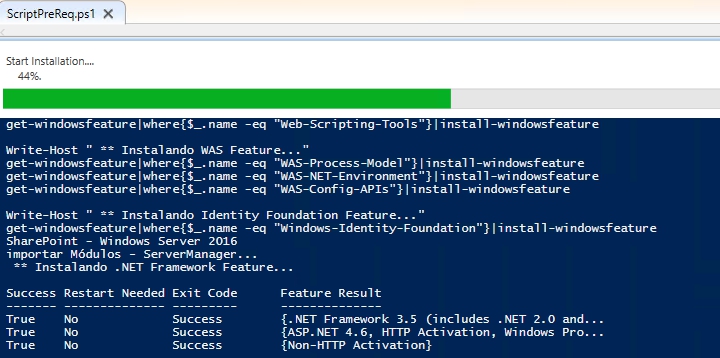
Write-Host "SharePoint - Windows Server 2016"
Write-Host "importar Módulos - ServerManager..."
Import-Module Servermanager

Write-Host " ** Instalando .NET Framework Feature..."
get-windowsfeature|where{$_.name -eq "NET-Framework-Core"}|install-windowsfeature –Source e:\sources\sxs
get-windowsfeature|where{$_.name -eq "NET-HTTP-Activation"}|install-windowsfeature
get-windowsfeature|where{$_.name -eq "NET-Non-HTTP-Activ"}|install-windowsfeature
get-windowsfeature|where{$_.name -eq "NET-WCF-HTTP-Activation45"}|install-windowsfeature

Write-Host " ** Instalando 'Application Server' role..."
get-windowsfeature|where{$_.name -eq "AS-AppServer-Foundation"}|install-windowsfeature
get-windowsfeature|where{$_.name -eq "AS-Web-Support"}|install-windowsfeature

Write-Host " ** Instalando 'Web Server' role..."
get-windowsfeature|where{$_.name -eq "Web-Static-Content"}|install-windowsfeature
get-windowsfeature|where{$_.name -eq "Web-Default-Doc"}|install-windowsfeature
get-windowsfeature|where{$_.name -eq "Web-Dir-Browsing"}|install-windowsfeature
get-windowsfeature|where{$_.name -eq "Web-Http-Errors"}|install-windowsfeature
get-windowsfeature|where{$_.name -eq "Web-Http-Redirect"}|install-windowsfeature

get-windowsfeature|where{$_.name -eq "Web-App-Dev"}|install-windowsfeature
get-windowsfeature|where{$_.name -eq "Web-Asp-Net45"}|install-windowsfeature
get-windowsfeature|where{$_.name -eq "Web-Net-Ext"}|install-windowsfeature
get-windowsfeature|where{$_.name -eq "Web-Net-Ext45"}|install-windowsfeature
get-windowsfeature|where{$_.name -eq "Web-ISAPI-Ext"}|install-windowsfeature
get-windowsfeature|where{$_.name -eq "Web-ISAPI-Filter"}|install-windowsfeature

get-windowsfeature|where{$_.name -eq "Web-Http-Logging"}|install-windowsfeature
get-windowsfeature|where{$_.name -eq "Web-Log-Libraries"}|install-windowsfeature
get-windowsfeature|where{$_.name -eq "Web-Request-Monitor"}|install-windowsfeature

get-windowsfeature|where{$_.name -eq "Web-Stat-Compression"}|install-windowsfeature
get-windowsfeature|where{$_.name -eq "Web-Dyn-Compression"}|install-windowsfeature

get-windowsfeature|where{$_.name -eq "Web-Filtering"}|install-windowsfeature
get-windowsfeature|where{$_.name -eq "Web-Basic-Auth"}|install-windowsfeature
get-windowsfeature|where{$_.name -eq "Web-Windows-Auth"}|install-windowsfeature
get-windowsfeature|where{$_.name -eq "Web-Digest-Auth"}|install-windowsfeature
get-windowsfeature|where{$_.name -eq "Web-Client-Auth"}|install-windowsfeature
get-windowsfeature|where{$_.name -eq "Web-Cert-Auth"}|install-windowsfeature
get-windowsfeature|where{$_.name -eq "Web-Url-Auth"}|install-windowsfeature
get-windowsfeature|where{$_.name -eq "Web-IP-Security"}|install-windowsfeature

get-windowsfeature|where{$_.name -eq "Web-Mgmt-Tools"}|install-windowsfeature
get-windowsfeature|where{$_.name -eq "Web-Mgmt-Console"}|install-windowsfeature
get-windowsfeature|where{$_.name -eq "Web-Mgmt-Compat"}|install-windowsfeature
get-windowsfeature|where{$_.name -eq "Web-Metabase"}|install-windowsfeature
get-windowsfeature|where{$_.name -eq "Web-Lgcy-Mgmt-Console"}|install-windowsfeature
get-windowsfeature|where{$_.name -eq "Web-Lgcy-Scripting"}|install-windowsfeature
get-windowsfeature|where{$_.name -eq "Web-WMI"}|install-windowsfeature
get-windowsfeature|where{$_.name -eq "Web-Scripting-Tools"}|install-windowsfeature

Write-Host " ** Instalando WAS Feature..."
get-windowsfeature|where{$_.name -eq "WAS-Process-Model"}|install-windowsfeature
get-windowsfeature|where{$_.name -eq "WAS-NET-Environment"}|install-windowsfeature
get-windowsfeature|where{$_.name -eq "WAS-Config-APIs"}|install-windowsfeature

Write-Host " ** Instalando Identity Foundation Feature..."
get-windowsfeature|where{$_.name -eq "Windows-Identity-Foundation"}|install-windowsfeature
Copie e cole o Script no PowerShell e é só executar!
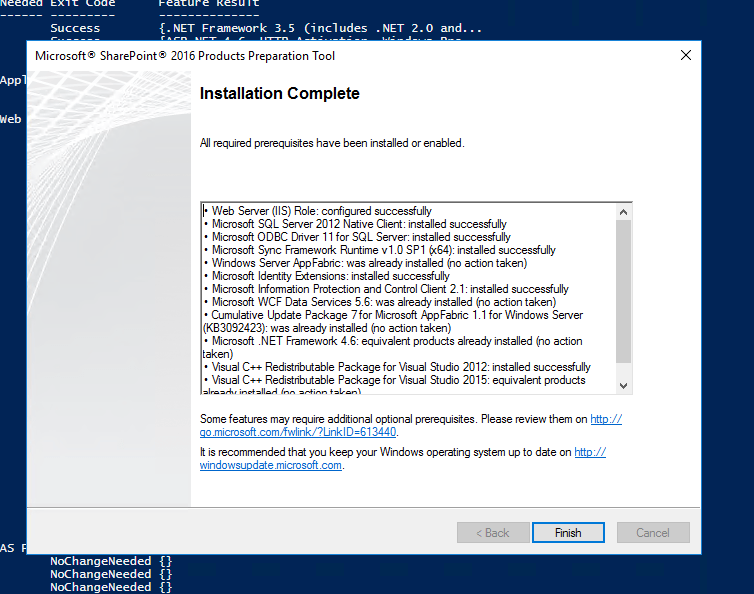
Abaixo mostra todos os PreReq instalados.

Agora é só rodar o PreReq Tools.
Show!!!!
Simples assim, só instalar o SharePoint ;).

Deixe um comentário